Policies
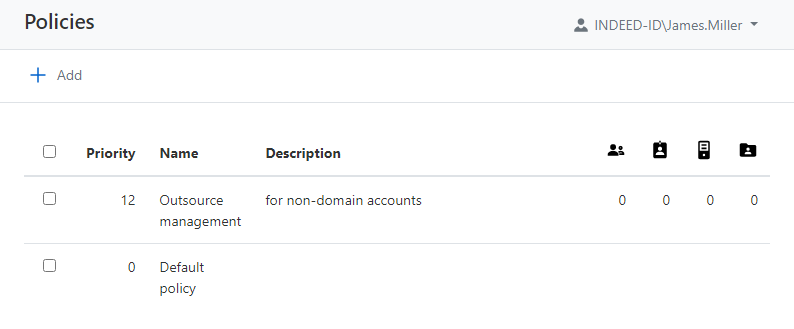
The section contains a list of policies, sorted by priority.
The following data is displayed for policies:
- Priority - a number indicating the order in which a particular policy is applied. Zero priority is the default policy that is applied last. The higher the policy, the higher its priority, and vice versa.
- Name - policy name.
- Description - policy description.
 - number of users with policy.
 - number of accounts with policy.
 - number of resources with policy.
 - number of domains with policy.

The default policy contains a set of parameters for all available sections and applies to all new objects, so it is advisable to start configuring there.
The default policy also applies to sessions opened on behalf of user accounts, unless other policies are explicitly applied to these users. |
Open the policy page, set the desired parameters for the Accounts, Sessions, RDP sections, save settings.
Adding new policy
| To add, view, edit and delete policies, you will need the appropriate claims from the POLICIES MANAGEMENT section (Policy.Create, Policy.Read, Policy.Update, Policy.Delete). |
Click Add in the Policies section, fill in the Policy Name, Description, and Priority fields. The new policy will appear in the list.
General information
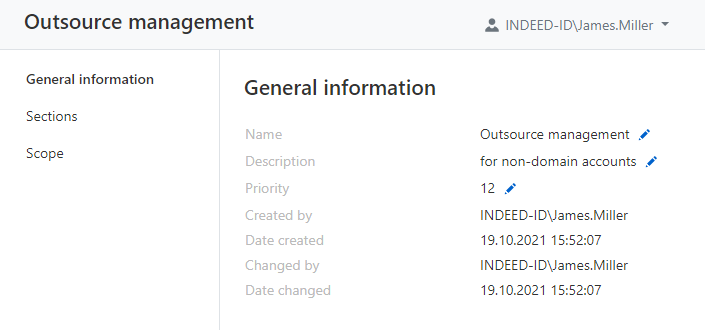
Open the policy page, review the general information, edit Name, Description, or Priority if necessary by clicking the pencil icon

- Name - the name of the policy, it is set when creating a new policy. It can be changed at any time.
- Description - policy description.
- Priority - a number indicating the order in which a particular policy is applied. Zero priority is the default policy that is applied last.
- Created by - Indeed Identity PAM administrator name.
- Date created - date and time when the policy was created.
- Changed by - name of Indeed Identity PAM administrator who saved the policy settings.
- Date changed - date and time when the policy settings were saved.
To edit Name, Description and Priority click ![]()
Sections
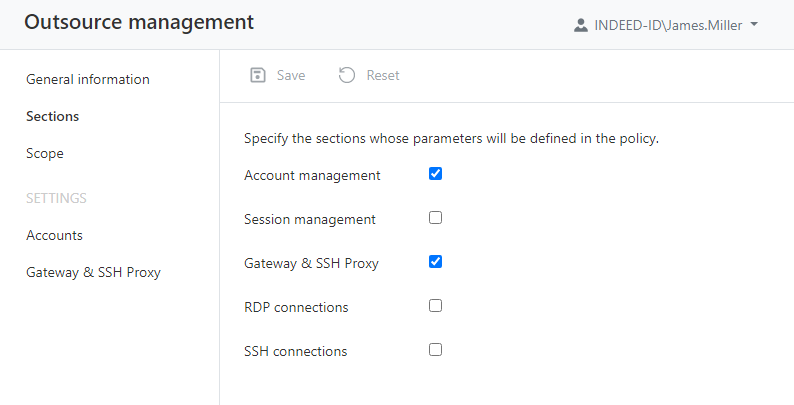
Go to the Sections and mark the sections which will be determined by the policy, save the changes. The corresponding sections will become available for setting up.

For unchecked sections, other policies will be applied by priority. |
Scope
| To assign policies you will need the appropriate claims (Account.SetPolicy, User.SetPolicy, Resource.SetPolicy, Domain.SetPolicy). |
Contains information about which users, accounts, resources, or domains the policy is applied to.
To apply a policy to an object, click Add, select the type of object to apply the policy,select the objects.
To remove the policy from objects, select the required objects and click Remove.
Creating a copy of the policy
Check the policy in the Policies section and click Create copy, fill in the Policy name, Description and Priority fields. The copied policy will appear in the list.
Removing policy
Before removing a policy, make sure that it does not apply to any objects.
Check the required policies in the Policies section and click Remove.
The Default policy cannot be removed. |
Changing the priority of a policy
Check one policy under Policies, click Change priority and enter a number for the policy priority value.
You can also change the priority by opening the required policy and in the General Information section click the pencil icon next to the priority value.
Policy sections
Accounts
| Option | Description |
|---|---|
| Сredentials showing settings | |
| Reset account password and SSH key after showing | If this option is enabled, the password and SSH key of the privileged account will be reset every time the user views it in his self service (user console). |
Reset password and SSH key after X minutes | After viewing, the password and SSH key will be reset to a random value after the specified number of minutes. |
Require a reason of password and SSH key viewing | If this option is enabled, the directory user must provide a reason before viewing the password or SSH key of the privileged account. |
| Password and SSH key viewing must be confirmed by PAM administrator | Before each credentials viewed by user it must be confirmed by PAM administrator |
| Password and SSH key confirmation timeout, min. | Timeout of waiting for confirmation of password and SSH key viewing, from 1 to 180 minutes. |
| Encrypt SSH key using generated password before showing to user | If this option is enabled, the SSH key will be shown in encrypted form, and the generated encryption password will be hidden. The encryption key and password is generated by PAM every time the data is viewed. |
| Check and reset credentials settings | |
Periodically synchronize resources and accounts | If this option is enabled, then an automatic search for data and privileged accounts on resources will be performed. |
| Synchronize resources and accounts once in X days | Automatic search for resource data and privileged accounts will be performed once every specified number of days, from 1 to 10,000 days |
| Periodically check account password and SSH key | If this option is enabled, then passwords and SSH keys will be automatically checked for privileged accounts. |
| Check password and SSH key once in X days | Automatic check of the password and SSH key of privileged accounts will be performed once every specified number of days, from 1 to 10,000 days. |
| Reset password and SSH key if a mismatch is detected | If this option is enabled, then passwords and SSH keys will be automatically reset in case of mismatch between PAM and resources. |
| Remove SSH keys unmanaged by PAM | If there is no SSH key for the added account in PAM, but there is one on the resource, then all discovered keys from the resource will be removed. |
| Check password and SSH key if it's set manually | If this option is enabled, a check will be performed when setting or changing a password or SSH key. |
| Periodically change account password and SSH key | If this option is enabled, the password or SSH key will be automatically changed to a random value for privileged accounts. |
| Change password and SSH key every X days | Automatic change of password or SSH key for privileged accounts will be performed once every specified number of days. |
| Password requirements | |
| Generated password length | Total number of characters for automatically generated and manually entered passwords. |
| Min. password length (manual input) | The minimum number of characters when manually changing the password. |
| Lowercase letters | If this option is enabled, then automatically generated passwords will consist of lowercase letters. When combined with other settings, the password will contain at least one lowercase letter. |
| Uppercase letters | If this option is enabled, then automatically generated passwords will consist of capital letters. When combined with other settings, the password will contain at least one uppercase letter. |
| Numbers | If this option is enabled, then automatically generated passwords will consist of numbers. When combined with other settings, the password will contain at least one number. |
| Special characters | If this option is enabled, then automatically generated passwords will consist of special characters. When combined with other settings, the password will contain at least one special character. |
Sessions
| Option | Description |
|---|---|
| User must specify the connection reason | If the option is enabled, then when connecting to the resource, the user must indicate the reason for starting the session. |
| Limit session duration | If the option is enabled, after the specified duration the session will terminates automatically. |
| Maximum session duration | The option enables the session duration limit in hours and minutes, after which the session will ends automatically. |
| Enforce exclusive usage of account | If the option is enabled, then the only one active session can be opened for account |
| Start of the session must be confirmed by PAM administrator | If this option is enabled, then manual confirmation by the PAM administrator is required for each opened session. |
| Session confirmation timeout, min. | Timeout for confirmation by the PAM administrator, in the range from 1 to 180 minutes |
| Reset password and SSH key at the end of the session | If the option is enabled, the password and SSH key will be reset after each session. |
| Save text | If the option is enabled, then after the session will be available for viewing and downloading a text log. |
| Save video | If the option is enabled, then after the session is completed, video recording will be available. |
| Frames per second | The setting determines the frame rate for video recording. |
| Video resolution | The setting allows you to set the resolution for video recording. |
| Video log rotation | If this option is enabled, then video recordings will be automatically deleted. |
| Remove video older than X days | Automatically delete video recordings older than the specified number of days. |
| Save screenshots | If this option is enabled, then screenshots of the session will be saved. |
| Screenshots interval, sec. | Saving a screenshot after a specified number of seconds. |
| Screenshots resolution | Setting allows you to set the resolution of the screenshot. |
| Screenshots log rotation | If this option is enabled, screenshots will be automatically deleted. |
| Remove screenshots older that X days | Automatically delete screenshots older than the specified number of days. |
| Save transferred to server files | If the option is enabled, then the files will be duplicated in the specified network folder when transferred to the server. |
| Transferred to server files rotation | If this option is enabled, transferred files will be automatically deleted. |
| Remove transferred to server files older than X days | Automatically delete transferred files older than the specified number of days. |
Gateway & SSH Proxy
| Option | Description |
|---|---|
| Override Gateway settings | If this option is enabled, the following settings will be used instead of those specified in the Configuration section. |
| RDCB address | Remote Desktop Connection Broker IP address/DNS name |
| RDCB collection name | Remote Desktop Connection Broker collection name for PAM Gateway |
| Use RDGW | Connect to Indeed Identity PAM Gateway with Remote Desktop Gateway |
| RDGW address | Remote Desktop Gateway address for PAM Gateway |
| Override SSH Proxy settings | If this option is enabled, the following settings will be used instead of those specified in the Configuration section. |
| SSH Proxy address | IP address or DNS name and port (optional) |
RDP
The settings are applied only when connecting to servers via RDP. |
| Option | Description |
|---|---|
| Printers | If the option is enabled, then the user will be able to forward the printer from his workplace to the final resource. |
| Clipboard | If the option is enabled, the user will be able to use the clipboard between his workstation and the end resource. |
| Smart cards | If the option is enabled, the user will be able to forward the smart card from his workplace to the resource. |
| Ports | If the option is enabled, then the user will be able to forward COM ports from his workstation to the final resource. |
| Local drives | If the option is enabled, then the user will be able to forward local disks from his workplace to the resource. |
| RDP file parameters | Parameters that will be added to RDP connection settings, also they will replace old ones. |
SSH
Privilege elevation
- Allow run pamsu - support for executing commands with root privileges on resources with the PamSu component installed.
Allowed and forbidden commands
- Prompt - regular expression to correctly recognize command input.
- Reaction to forbidden command - terminal behavior in response to a forbidden command: CTRL + C (cancel execution) or Abort the session.
Creating a list of controlled commands:
- Click the Add button
- Enter the command or regular expression
- Select the status Allowed or Forbidden.
Restricting command execution takes priority over permission. Without explicit permission, commands will be considered forbidden, so it is not recommended to remove the last rule that allows command execution. |
To allow or prohibit several commands at once, select them with the check boxes and click the appropriate button.
When working with the list of commands, as well as when trying to execute a prohibited command, the corresponding events are recorded in the Events section.